
I Just Poured Water on my Scanner….
Chip that come into the museum are all scanned on a Canon 5600F flatbed scanner. It has a good (there is some better though) depth of field, and its fast. Typically chips are scanned at 300dpi, or for small ones (or ones that have a die visible) 600dpi. This keep the file sizes reasonable, yet still allows them to be studied in good detail on CPUShack.com as well our records.
There are on occasion chips that are VERY hard to scan, either the markings are very small, or very shallow. This is becoming common on more modern chips, for one the chips themselves are smaller, and second, they are most often laser marked, and there isn’t enough thickness in the package (or die on some) for the Grand Canyon engraving of the 80’s.

1200 dpi dry scan
This is a Intel QG80331M500 IO Processor made by Intel in 2007. It is the replacement for the 80960 based I/O processors, using instead a 500 MHz XScale ARM Processor core. This scan was done at 1200 dpi, the part number is visible, barely, but the S-spec and FPO (lot code) are not. The markings are laser etched directly onto the surface of the silicon die. This is fairly common on this type of chip (as well as most all of Intel chipsets). How do we improve upon this? Bumping the resolution to 2400dpi just makes a bigger blurry picture (with more noise). What we need is better resolution, at where the scanner works best (less noise at 1200 dpi scan).
Thankfully we can use a ‘technology’ that is very much similar to how modern processors themselves are now made. Dumping water on the scanner, also known as immersion scanning.
In making IC’s the most common light source is 193nm light. Generally this would limit the feature size that could be resolved (in this case light through the mask onto the wafer) to 1/2 to 1/3 of that, depending on the quality of the lens. That means features of around 65nm. However, modern chip making replaces the air between the lens and the wafer with a liquid. The effective resolution is then increased by the refraction index of the liquid. Water, with 193nm light, has a refraction index of 1.44 (or 1.33 for mid-visible light), while some more exotic fluids created just for this, have indices of nearly 2.0
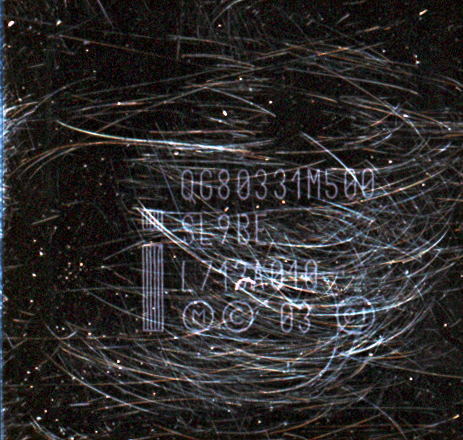
1200 dpi wet scan
This exact concept also works on a scanner. A small amount of water is placed on the scanner bed (and contained as to not get IN the scanner, as that does NOT help the process). The chip is then placed in the water, thus the air between the glass and the chip is replaced. Air had a refraction index of approx. 1.0 while water is 1.3. You can clearly see the results. The S-spec is now clearly visible. The scan is still at a 1200 dpi resolution but there is much sharper features.
This same technique has been used for some time for film scanning, there are also much more sophisticated immersion fluids that work better than water, which with the continual shrinkage of chip markings, we may have to try. Just be sure to keep it on the scanner, and not in.
March 30th, 2015 at 7:38 am
[…] http://www.cpushack.com/2015/03/29/i-just-poured-water-on-my-scanner/ […]
March 30th, 2015 at 7:44 am
[…] http://www.cpushack.com/2015/03/29/i-just-poured-water-on-my-scanner/ […]
March 30th, 2015 at 7:51 am
It is interesting to see how in the dry scan the ‘scratches’ are vertical and in the wet scan almost horizontal. Or maybe it is just my impression.
March 30th, 2015 at 10:19 am
Some of those may actually be on the glass itself, so since the chip wasn’t in the exact same spot, appear different.
March 30th, 2015 at 8:16 am
Nice technique, but how do you actually contain that water ensuring that it won’t spill all over the circuits ?
I assume that’s just a neat trick that you won’t reveal ?
Thanks for this nice piece of info, actually quite a neat hack to improve image quality.
March 30th, 2015 at 10:17 am
The surface tension of the water is usually enough to contain it if you don’t use too much, I use a weighted cloth around the edge in case though. Not talking a lot of water but still use caution.
March 30th, 2015 at 8:24 am
The traditional fluid used to get rid of reflections is called “Canada Balsam”
one drop on the chip and lay it down. It is clear on it’s own.
Microscope supply places sell it for a few $$. It is viscous and will not run off quickly if the scanner is not level.
Any college microscopy lab will have it.
http://en.wikipedia.org/wiki/Canada_balsam
In xylol it is less viscous. because it is gummy, remove it before it dries
March 30th, 2015 at 11:12 am
Did you rotate the chip ? the specs highlights a different set of scratches. Nice trick anyway.
March 30th, 2015 at 11:15 am
I may have, i don’t remember now
March 30th, 2015 at 8:47 pm
Looks like what you really need is a scanner that isn’t scratched all to heck.
March 30th, 2015 at 8:54 pm
It is time to replace the glass lol. I use a cover glass on it so I can do so, howver for 99% of scans its not an issue.
March 30th, 2015 at 10:57 pm
Nice trick, but what’s the use of those images when the scanner glass is almost matte with scratches?
March 30th, 2015 at 11:08 pm
The chip itself is heavily scratched, which is most of what you see.
There are some scratches on the scanner glass, but they are insignificant for most of what I do (and the glass is easily replaceable, which I do every could months)
March 30th, 2015 at 11:18 pm
Film photographers have used wet mounting to get the most out of our negatives and transparencies for quite a while. Not only does it hide scrtches, but also helps extend dmax, the range of discernable brightness values.
March 30th, 2015 at 11:33 pm
Thats probably helping here too I would think.
March 31st, 2015 at 6:52 am
I’m trying to grok how this is helping so much. It sounds like you are increasing the numerical aperture of your illumination and imaging as well as optically coupling the face of the chip to the glass. Since you only changed the top surface of the glass you can’t really be changing the NA since a ray from the chip at an angle that would have made it through the glass is now hitting the underside of the glass at a larger angle and so totally reflecting back up into the glass.
I suppose you are getting more light at higher angles due to less Fresnel loss on the top surface, so even though there’s Fresnel loss on the bottom surface, you still get more high-angle light through (and the high-angle light is basically what carries the high-resolution data).
As for illumination, the optical coupling will cut down on visible dust and on glare, and on back reflections (double images). Also, the light that TIRs (mentioned above) isn’t lost: it’ll diffusely reflect off the chip again, some of which will be within the acceptance angle of the optics.
All in all, it’s a little surprising that it seems to work as well as it does and I still feel like I’m missing something. Very interesting.
December 7th, 2017 at 9:25 pm
Essentially water is filling in the cracks and scratches. It has a refractive index closer to glass than air. So by lessening the refraction errors you’ll get a cleaner scan. Simple as that.