
How to 386 Your AT: Intel Inboard 386/AT
With the release of the 32-bit Intel 386 processor in 1986, owners of IBM PC/XT and AT type systems (8088 and 80286 systems) were left a bit in the dust. This was a concern (or opportunity) for Intel as well. They designed an upgrade solution at the same time as the 386, to be able to be used in the now obsolete computers. This was the Intel InBoard 386 series of upgrade cards.
InBoard 386 AT with 1MB of RAM and 80287 FPU Option (very unusualy on a late model Inboard, this one from 1990, but the FPU is from 1986)
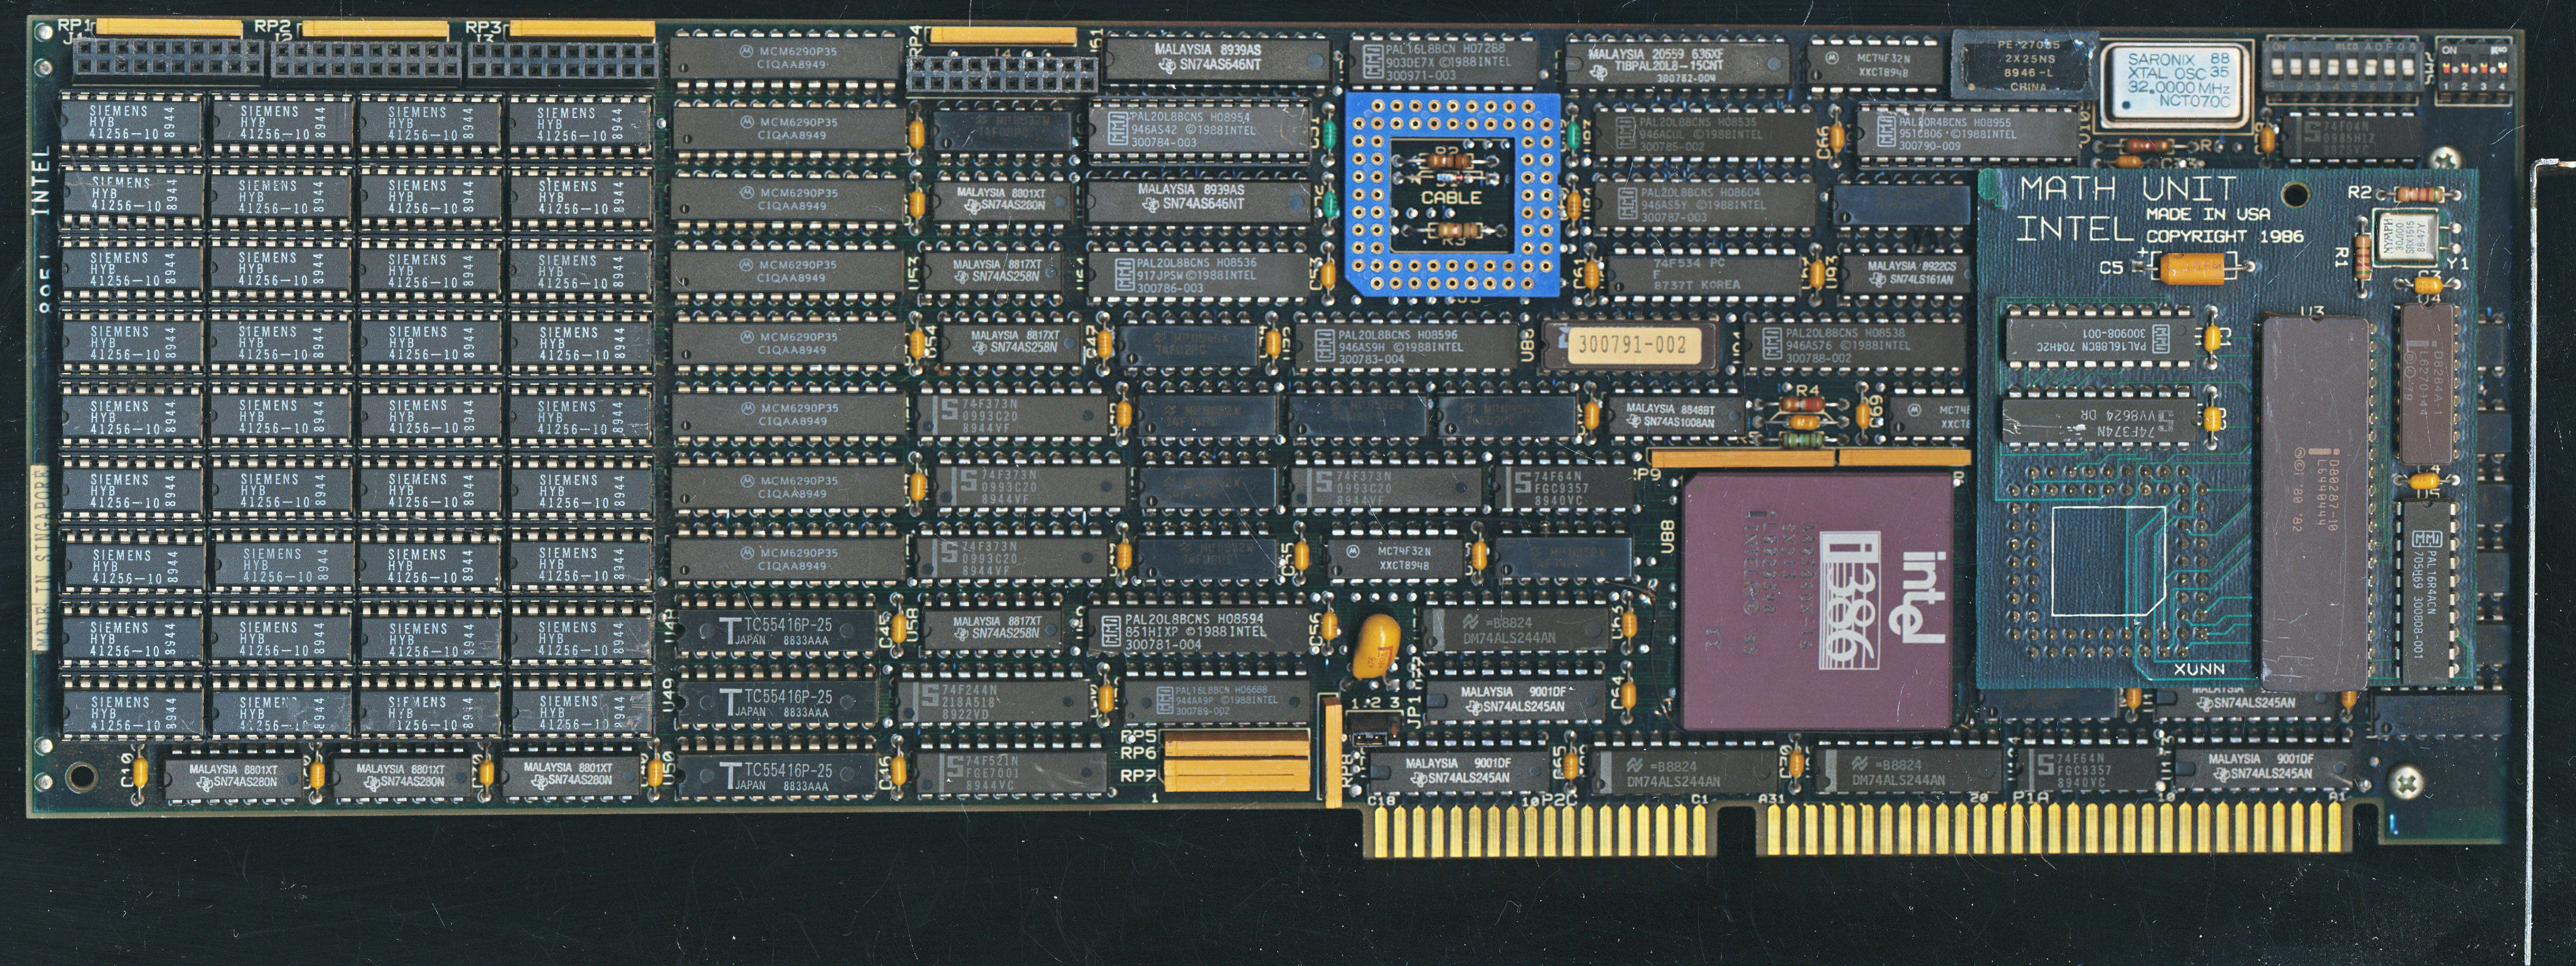
The InBoard, as its name implies, was a internal 16-bit ISA card that was used to upgrade these systems. It included a 386DX processor running at 16MHz, 64K of cache, and (optionally) 1-3MB of additional RAM. Two version of the board were made: the PC/XT version was designed for 8088 processor based systems, and the AT version was for the 286 systems. These boards required the removal of the original processor, and then a cable was ran from the old CPU socket, to the the InBoard 386 board. On system start up the original BIOS booted the system, and loaded the DOS operating system. The config.sys file would then call on the drivers to load the InBoard 386 specific features. The original system was essentially unaware of the new processor, instructions were executed by the InBoard transparently.

Flat Ribbon Cable used for connecting the board to the old CPU socket. If the cable could not reach the socket, your system was not compatible. Cable length was restricted by signal timing, rather then the common complaint of Intel being ‘stingy’
Early AT systems used a 6MHz CPU and ISA bus speed, so Intel provided a 8MHz crystal to replace the original on the motherboard. This ensured the ISA bus that the InBoard used to communicate with the original memory and peripherals ran fast enough and did not become such a huge bottle neck. The base model InBoard did not come with any RAM, it could use your existing system RAM just fine. Adding RAM, however, was a worthwhile upgrade. The Board itself supports 1M (36 100ns 256 kbit chips, including parity) and a daughter card could add another 1M or 2M. This RAM was accessed via the 80386s 32-bit address bus so was much quicker. It also was a single wait state access. You could configure the InBoard to backfill (take over for) your existing system RAM, at least down to 256K, so that the computer would only use the first 256K of the slower RAM before moving to the RAM on the InBoard. If your system had 512K of RAM you would ‘waste’ half of it but at the benefit of much faster access times. The Inboard 386 had another trick up its sleeve to improve speed…
The Inboard included 64K of 35-45ns cache for its 386 processor, which contributed greatly to its performance increase. These were implemented by 8x Motorola MCM6290P35 (or similar) 16k x 4 SRAMs and 3x TC55416P-25 16kx4 SRAMs for Cache Tags. Early boards had unmarked gold cap chips implementing the cache, this type and speed of SRAM was relatively expensive in 1986. This allowed the Inboard to execute most (Intel claimed 90%) of memory request instructions without having to go to main memory (on the original motherboard and on the Inboard card itself). Today cache is a common feature on almost all processors, with L1, L2 L3 and sometimes even fourth level caches, but back in 1986 it was a relatively new thing. This cache was accessed by the 386 with 0 wait states, making it very fast. In some tests this allowed the InBoard 386/AT to actually outperform a native 386 system (without cache).
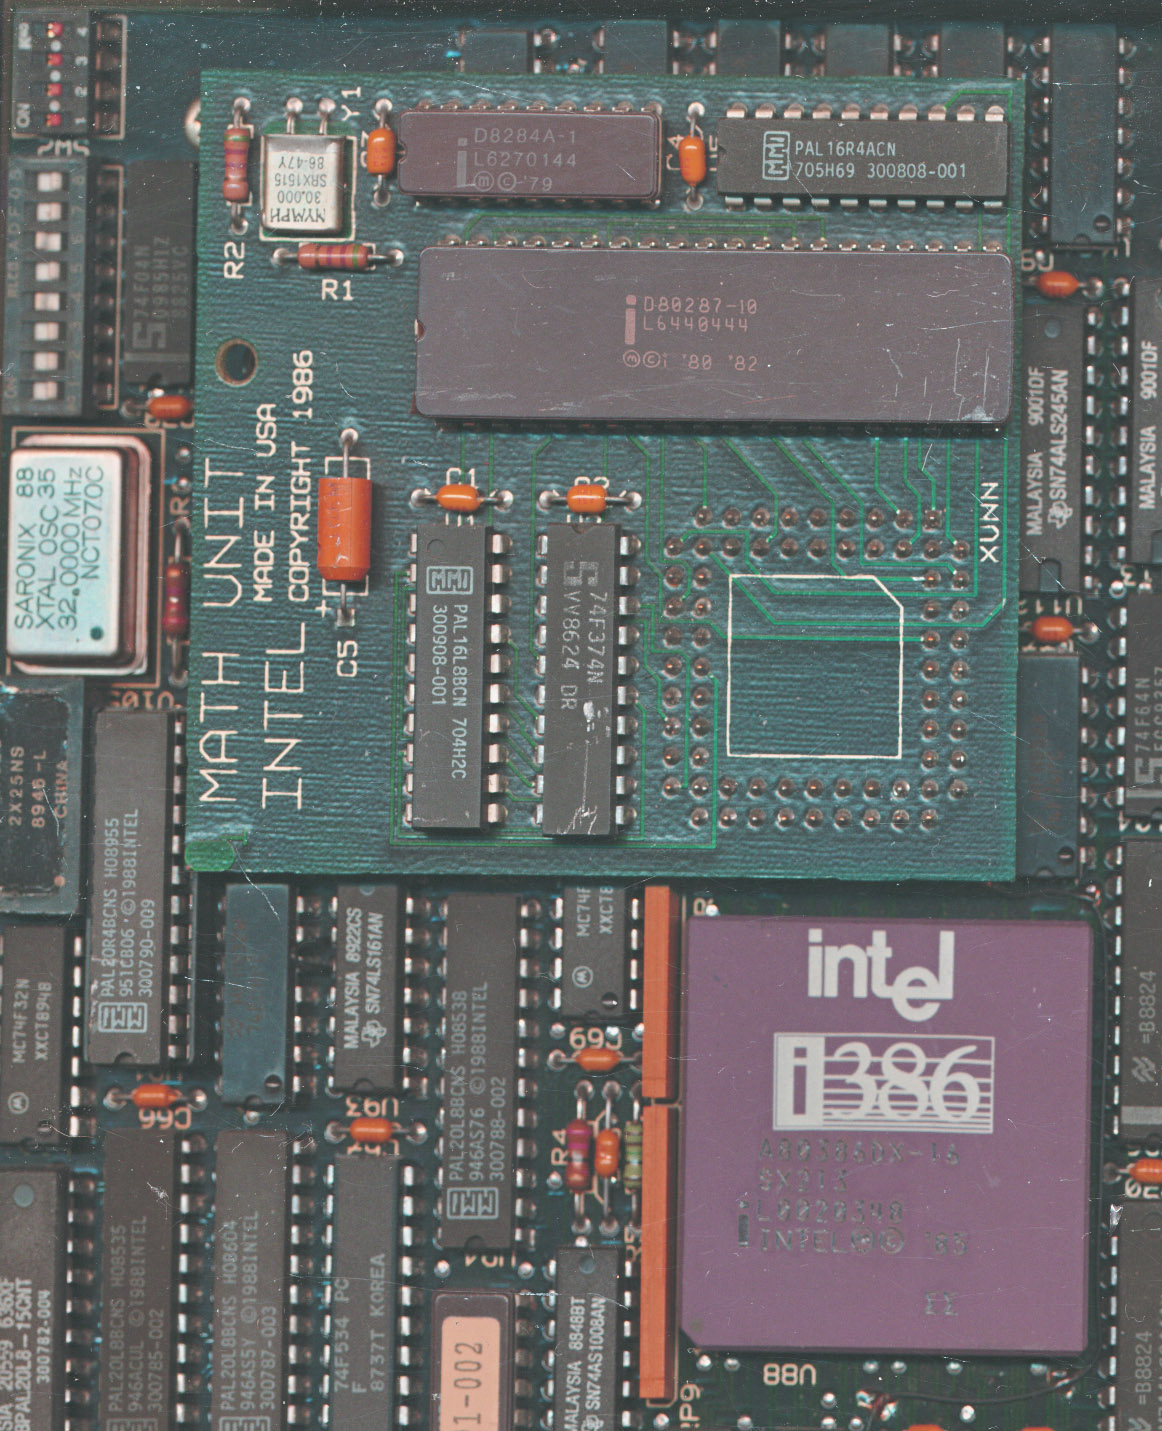
Intel A80386DX-16 SX213 from 1990 and 1986 80287 FPU option
The InBoard also supported an optional 80387 coprocessor for even faster performance. There was one problem with this when the InBoards were released…The 80387 was not yet ready, so instead Intel made an adapter to plug into the 80387 socket, and run a 10MHz 80287 coprocessor instead. This was adequate considering that most 286s at the time were 8-10MHz chips (which meant if they DID have a coprocessor it would run at 5-7MHz, 2/3s the CPU speed).
The software that came with the inBoard 386 had some interesting features. It could be configured to change the board speed at boot up, and on the fly. Originally this allowed 2 options, 8MHz and the full 16MHz. Later versions allowed 4 different speed steps The onboard cache could also be enabled/disabled on the fly, and a disk cache could be enabled to use extended memory as a hard drive cache, further increasing performance.
When the Inboards came out in 1986/87 they were, at least by today’s standards, rather expensive. The base model with no RAM and no FPU was $1995, add 1MB of RAM and that hits $2495 (and nearly $3000 for the 2M version. The FPU option (the 287 based one at least) was another $495. The installation kit (there was different ones for PLCC and PGA based 286s) were $200 each. The ribbon cable to connect the board to the
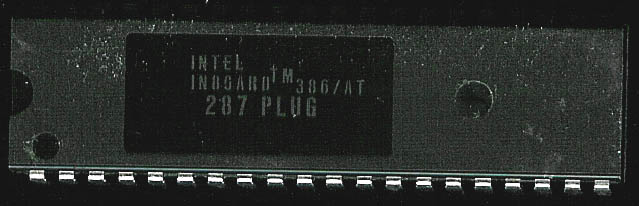
A ‘PLUG’ was required for the 287/387 option to go in the existing motherboard 287 socket. Its only purpose is to tell the system that it does have an FPU (as some software required a hardware FPU)
CPU socket, was a $200 item, so careful installation was a must. Consider though that a basic PC at the time was $5000, about the same as the price of a new economy car ($11000 in 2019 dollars), so that made the InBoard an appealing upgrade for those with 286 based systems. For half the money of a new PC one could have nearly the same (and in some cases more) performance. By 1989, and the release of the i486, the base price of the InBoard 386/AT had dropped to $1295, or $1995 for the 1MB version. The AT version didn’t become as popular as the PC/XT version, perhaps because the performance gains of going from an 8088, even on an 8-bit bus system, to a 386 were greater then that of a 286->386.
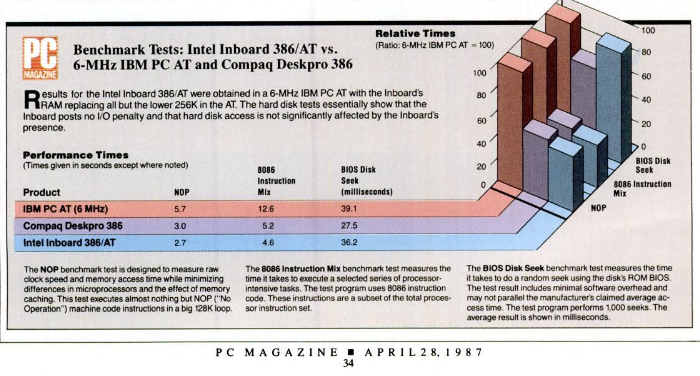
Benchmarks from PC Mag (and similar ones from InfoWorld) showed the InBoard 386, could be 10-12% FASTER then a standard 386 system. This is largely due to the cache.
As computers have gotten so much less expensive, and obsolete so much faster, upgrades like these have become a thing of the past, but in the 80’s and 90’s they were incredibly popular in their many forms. After the InBoard series, Intel made a line of Overdrive processors throughout the 1990’s and companies such as Everygreen, PNY, Kingston, Powerleap and many others made entire businesses out of designing upgrades for older computers.
August 15th, 2019 at 11:15 am
Thanks for interesting Facts =) A very interesting and unusual board, and I want to put two of them in the system unit. Interested in the performance of two such PCcard-computers could somehow be combined?
May 20th, 2020 at 10:05 pm
Hello CPU Shack and Hobbyist bloggers:
Amazing write up on the Intel Inboard 386 accelerator! I have just purchased one on eBay. However there was no cable with it… Is there any website or technical manual that would have the pinouts so I could fabricate my own cable to the 40 dip 8088 processor socket. I do not want to get the pins mixed up! It could cause serious serious smoke coming from my IBM 5150 computer! I tried the Installation manual for the Intel Inboard 386/PC and no such luck! I also found a picture even with the cable part number. But even with that number nothing comes up over a Google search?
Thank You So Kindly;
M. T. Ball
May 20th, 2020 at 10:11 pm
Was there anything on bitsavers?
October 6th, 2021 at 10:27 pm
I just got a 5150 with the cable.. I could get a pinout for you. I’d also look around for a card schematic.. should say on that. It’s just a ribbon cable, so you could probably solder it to a separate socket as a way to attach to be able to press into the one onboard.
April 10th, 2024 at 1:14 am
Hi, I need the drivers for this inboard 386/AT, I found one and fixed it but all the drivers available online are not matching the support page of intel in the wayback machine from 1999, if you have the drivers please archive them to archive dot org. thanks a lot!